

Connecting Power Apps to Business Central on-premises data
So, you want to connect your Power App to Business Central on-premises data? Had a look at the Microsoft documentation, but don’t know how to proceed? Then this blog post is for you!
I had the same problem. I needed to connect to BC on-prem data for a Power App. However, the documentation was brief and not a complete guide. When connecting to NAV data in Power Apps, using your ODATAv4 base URL was sufficient. This does not work for BC, however. In order to connect to BC on-prem in Power Apps, the steps below need to be taken.
- Enable REST API’s in the Business Central Administration Center.
- Configure an SSL certificate and configure the firewall so Power Apps can communicate with your BC on-prem instance.
- Define the REST API endpoint.
- Create a service account in Business Central necessary for authentication.
- Test the API with Postman.
- I assume you have knowledge of how to use Postman or any other API testing tool.
- Connect to your on-prem data in Power Apps!
1. Enable REST API’s in the BC Admin Center
The Microsoft documentation on the BC on-prem connector states we need a web service URL to connect to our data. In NAV this was the ODATAv4 base url. This is not applicable for Business Central. In BC, your REST API endpoint acts as your web service url. This means that configuration needs to be done in the BC admin center. If you are a consultant, let your tech engineer configure this. I did ;-). Some changes also need to be made to the firewall, more about that in step 2.
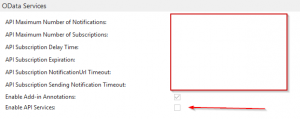
Anyhow, open the Business Central Admin Center. Select your service tier, navigate to the OData Services tab. On this tab, enable the API services. API services are now enabled on your service tier.
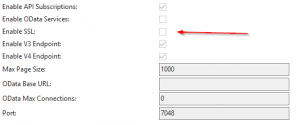
2. Configure SSL and configure the firewall
Next up is to configure SSL in the BC admin center. You’ll need a certificate for this. Also, outbound and inbound network traffic running over the port for the OData web services needs to be exposted through the firewall. This makes it possible to communicate with the Power Apps cloud service. Again, if this is not your expertise, let your colleagues do it :-).
3. Define the REST API endpoint
Once the configuration of the service tier is completed, we need the correct REST API endpoint that matches our BC version. The endpoint is built as follows, and is derived from the Microsoft documentation about API endpoints. This endpoint should be matched to your own environment.
- Business Central 13: https://nav.contoso.com:7048/bc/api/beta.
- Business Central 14 and up: https://nav.contoso.com:7048/bc/api/v1.0.
The structure of the endpoint is as follows:
- https://nav.contoso.com:7048 -> base url of your BC web client.
- /bc/ -> server instance name.
- api/beta or api/v1.0 -> default endpoint as defined by Microsoft.
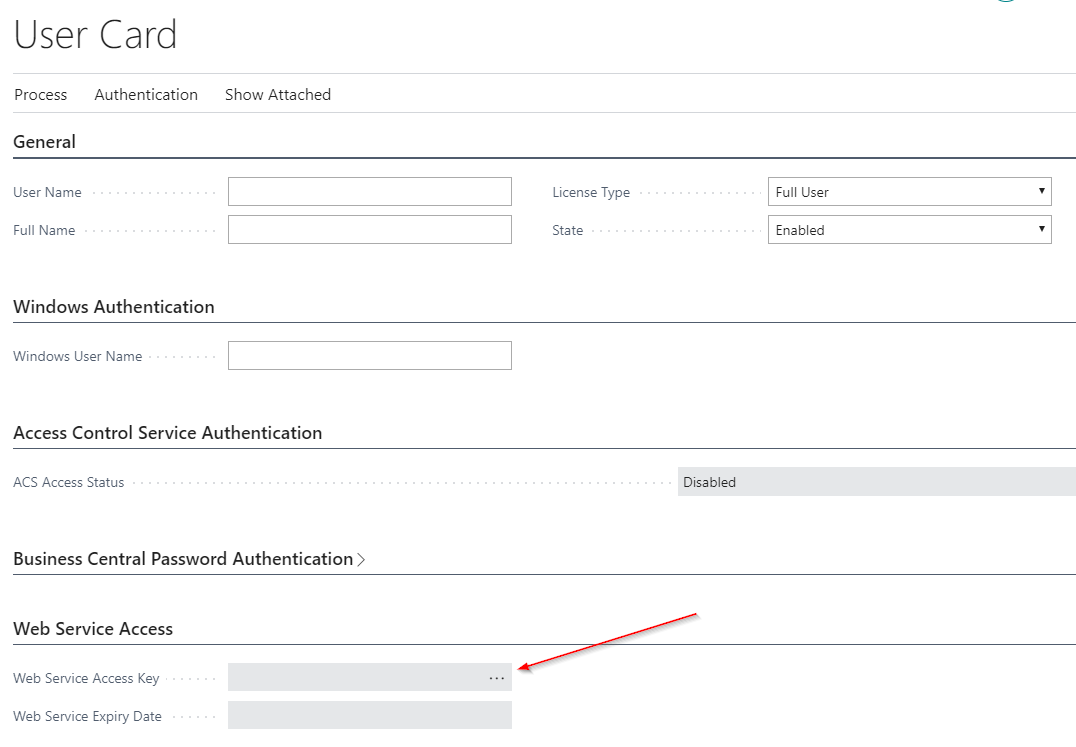
4. Create service account for use with the REST API
Next step is to create a service account for use with the REST API in Business Central. The assumption here is that there’s no synchronization between your on-premises Active Directory and your Office 365 Azure Active Directory. If you are synchronizing your on-prem AD with the cloud, you should be able to use your windows log-in in step 5 and 6. To create a service account for use with the REST API, do the following in Business Central:
- Navigate to the users page.

- Create a new user and assign a license to the user.
- Generate a web service access key on the user card.
5. Test the API with Postman
You should be all set! We’ve configured the REST API on the service tier and created the necessary user accounts. Next up: test if the API works!
- Use Postman or any other API testing tool to test the REST API.
- Call the REST API endpoint that is applicable to your BC server. Use a GET request.
- Business Central 13: https://nav.contoso.com:7048/bc/api/beta.
- Business Central 14 and up: https://nav.contoso.com:7048/bc/api/v1.0.
- Choose basic authentication as the authentication method.
- Username and password: username created in step 4. Password is your web service access key.

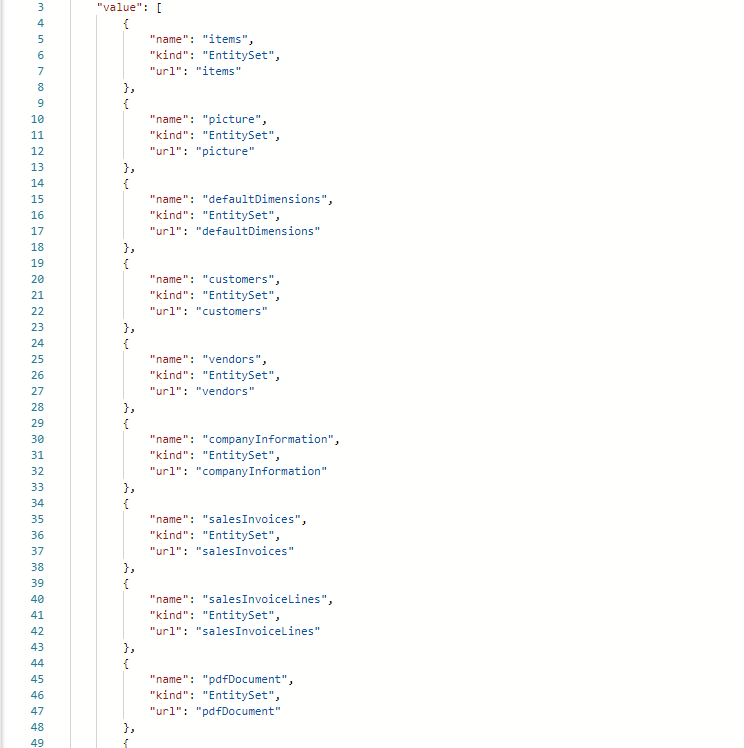
4. Calling the base URL should return all the entities exposed by the REST API. All of the endpoints that can be called, can be found in the Microsoft documentation: https://docs.microsoft.com/en-us/dynamics-nav/api-reference/v1.0/endpoints-apis-for-dynamics. You should get a 200 response, and the response should look like this:
6. Connect to your on-prem data in Power Apps!
Our API is up and running, so now we can connect to our on-prem data in Power Apps! In Power Apps, navigate to your connections (it’s Dutch in my screenshot ;-)).
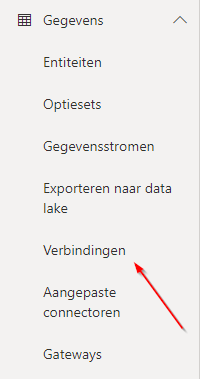
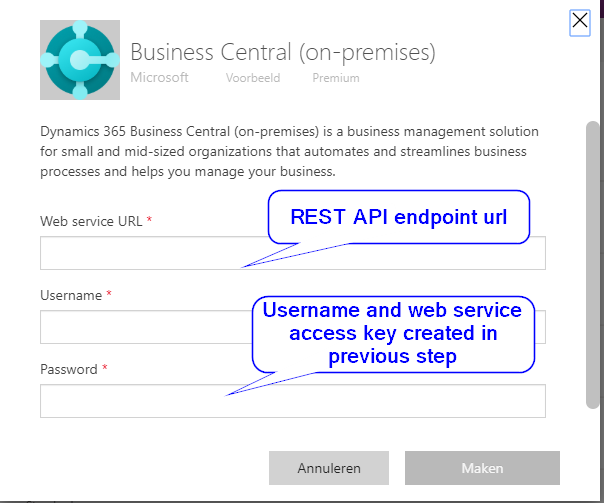
- Add a new connection, and select BC-on premises.
- Fill in the necessary information, defined in the earlier steps.
3. Boom! We now have an active connection that can be used in your Power App. Happy low-level coding!
