
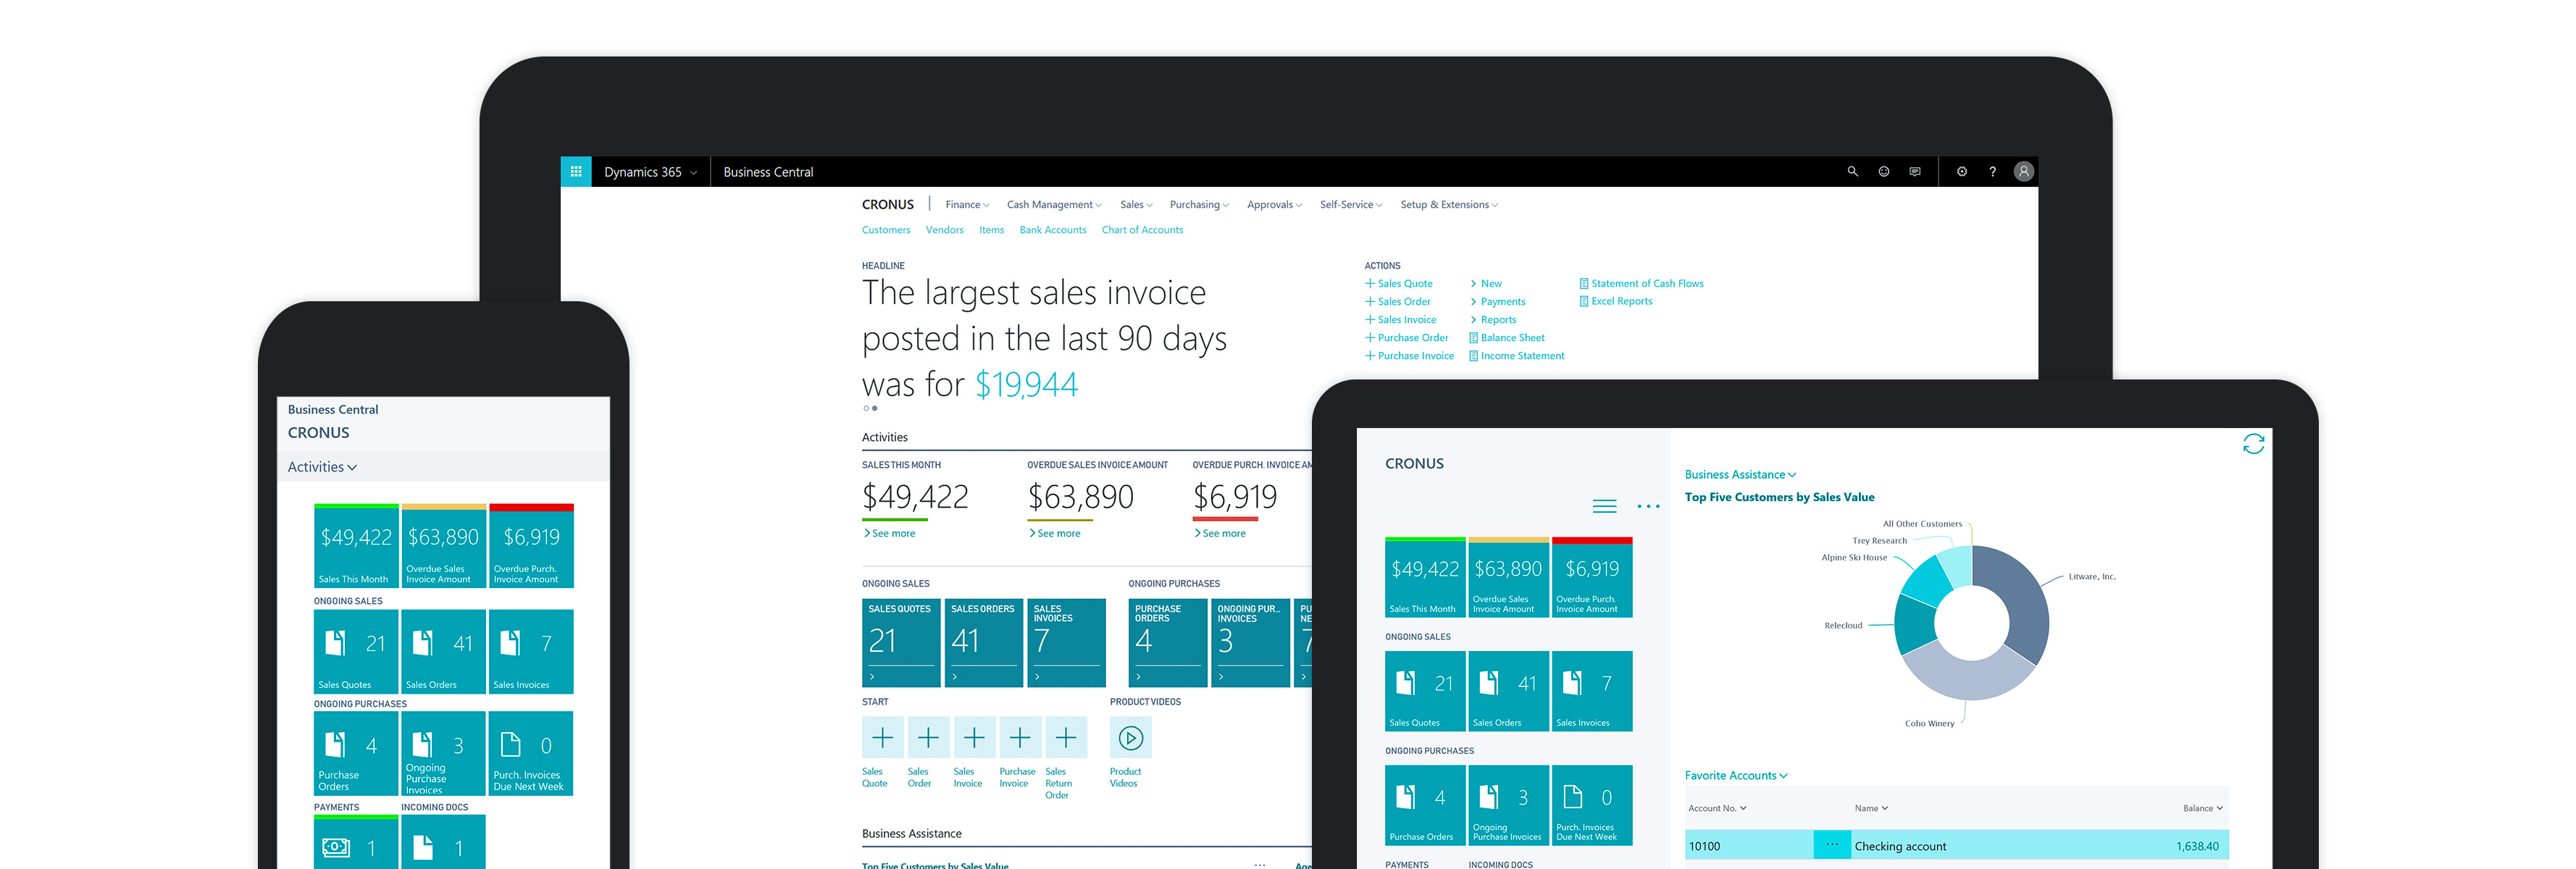
Business Central 🧡 Power Automate – Setting up Automated Workflows (Preview)
Since Business Central 20.1 it’s finally possible to set up Automated Power Automate Workflows again. Business Central 🧡’s Power Automate even more. With automated workflows your end-users can now manually trigger Power Automate workflows within the Business Central context. This means that:
- You’ll now get contextual information when triggering Power Automates from BC. This greatly improves the usability of Power Automate in combination with the Business Central ERP. The contextual info you’ll get includes:
- The SystemId of the record that was selected before triggering the Flow.
- A hyperlink to the record.
- The user who triggered the workflow.
- Etc.
In this blog I’ll show you what setup needs to be done to get this functionality working correctly. The Microsoft kb where I got this information from is: https://docs.microsoft.com/en-us/dynamics365/business-central/dev-itpro/powerplatform/automate-workflows. Some weird quirks / bugs are still present in the functionality because it’s a Preview Feature.
Anyhow, I’m super excited about this functionality because it opens the doorway to even more Citizen Development in combination with Business Central. Having said that, let’s get started!
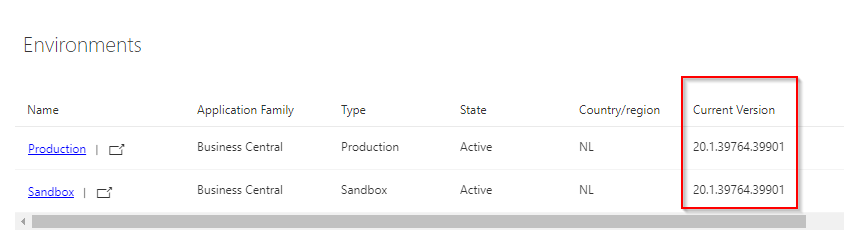
1. Running BC20.1
Our first step is making sure we’re running BC20.1. Go to the BC admin center and check your environment is runing 20.1. You can access the admin center through the following link: https://businesscentral.dynamics.com/<TenantID>/admin. Replace the TenantID with your own Tenant ID.
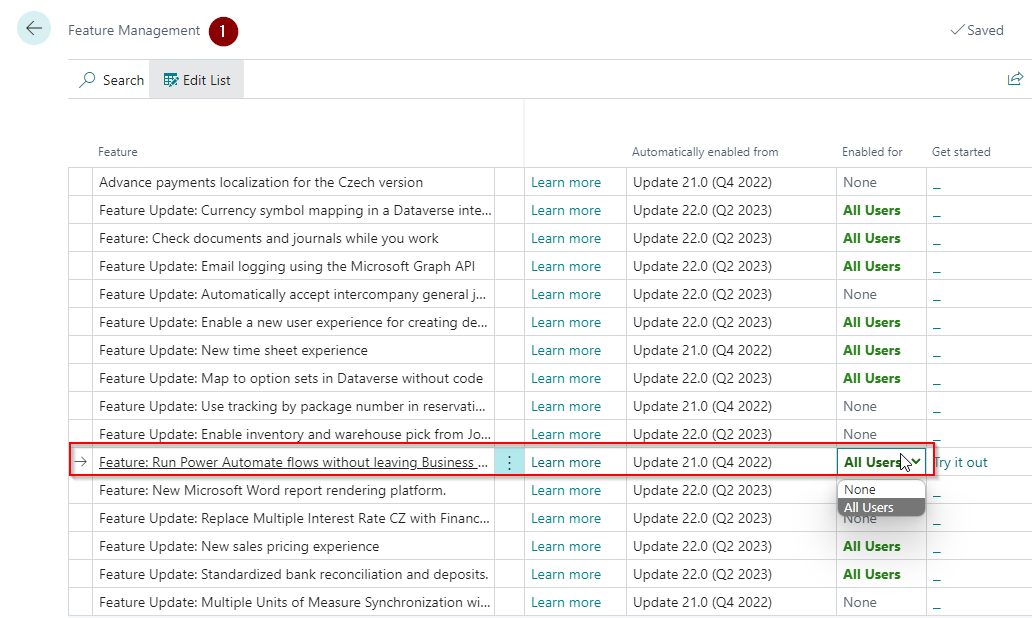
2. Enable Preview Features in Business Central
Open Business Central, navigate to the Page Feature Management and enable the feature “Run Power Automate flows without leaving Business Central (Preview)”. Enable this Preview feature for All Users, then sign out and sign in again in your Business Central environment.
3. Try out the Preview Feature
Next step is to Try out the Preview feature. Go to the Feature Management page again and click the “Try it out” link. A new browser tab will open and you can test out the feature.
You can only test this feature correctly by pressing the Try it out button. If you close your browser, session or clear your cookies this feature will not work again. You’ll need to press the Try it out button again to test the feature. You should be aware of this, it did cost me some valuable time during testing 😉.

4. Create a Power Automate Flow in the Item List
- Navigate to the item list. Use the Search function (Alt + Q), search for “Items” and select the item list.
- In the item list, go to Navigate -> Automate -> Power Automate -> Create a flow. Power Automate will directly open.
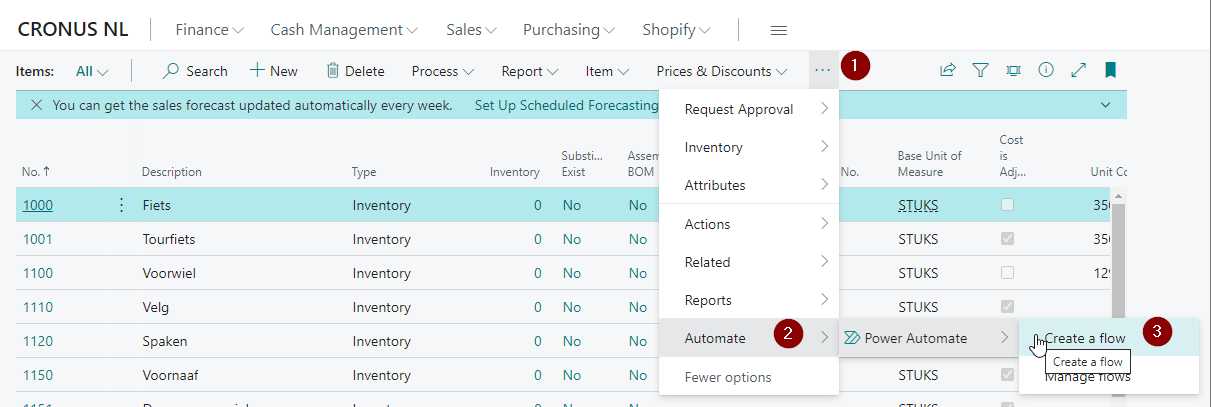
Power Automate will directly open.
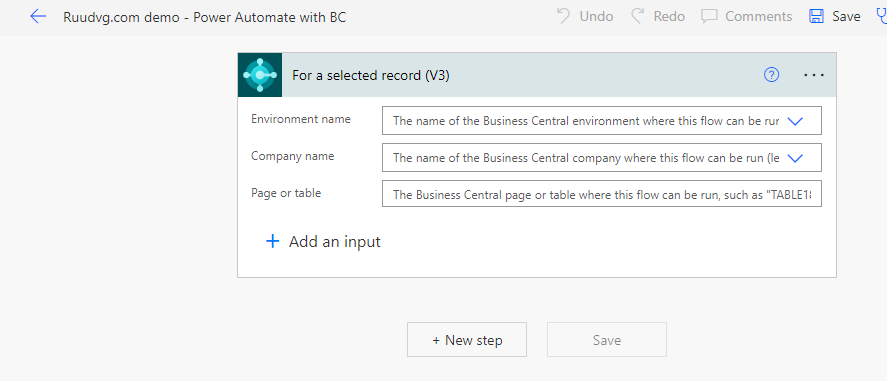
3. In Power Automate, fill the following information:
- Environment name.
- Company name.
- Page or table = TABLE27.
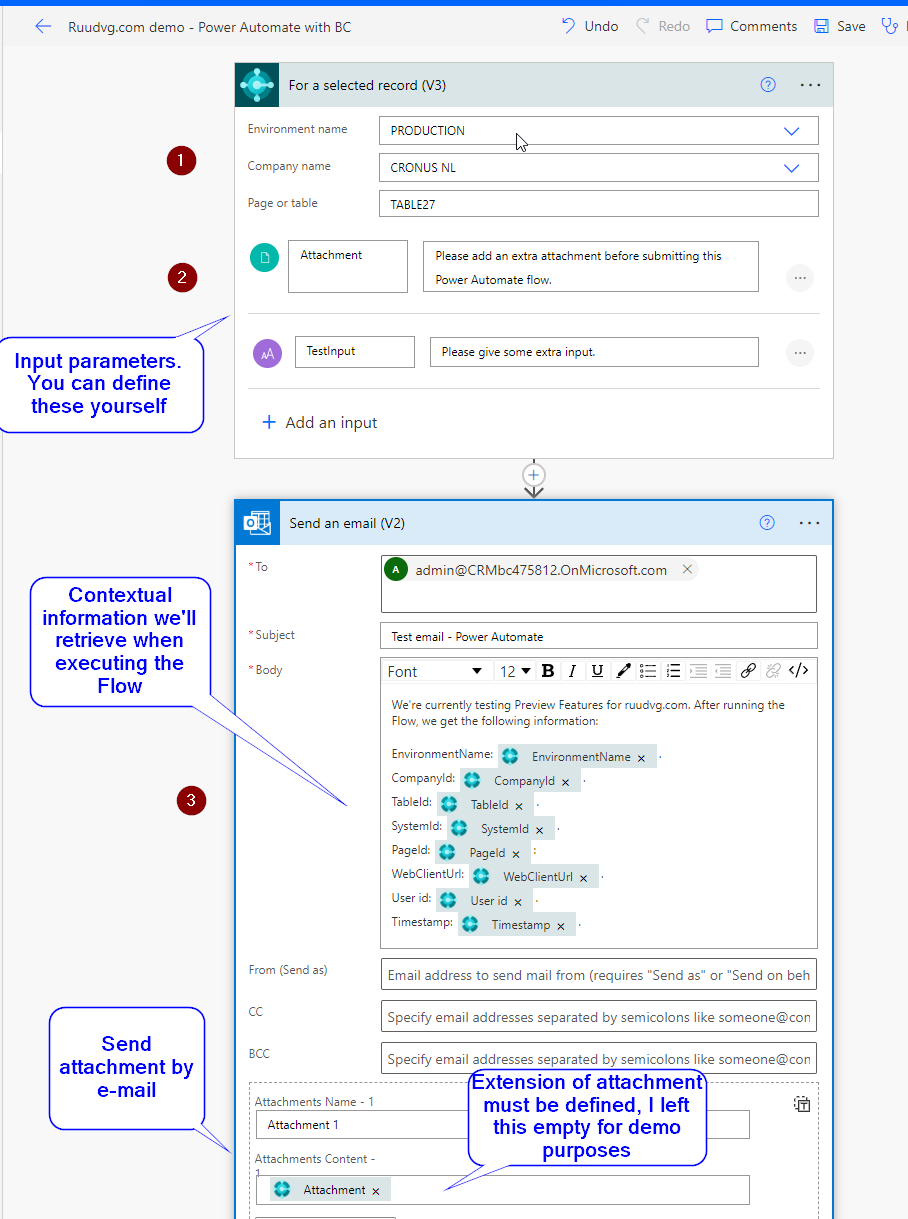
- Add at least 1 input parameter, otherwise this functionality won’t work correctly. This is probably happening because it’s in Preview.
Also add a “Send an email” action to see the result of the Power Automate feature. You can also see that we’ll send the attachment that the user adds in Business Central by mail.
4. Now save your flow.
5. Go back to Business Central and test the Flow
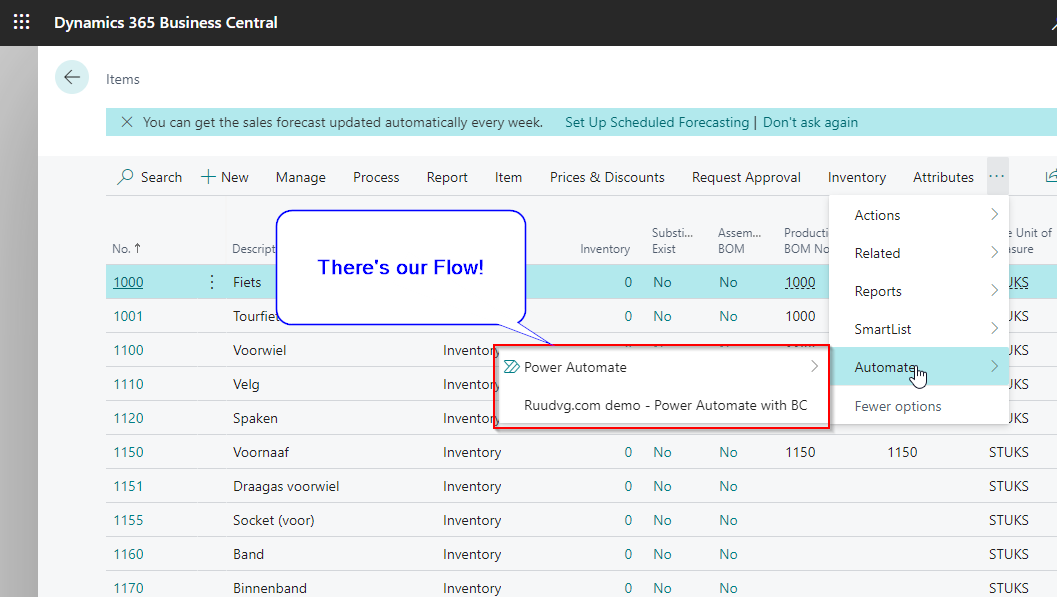
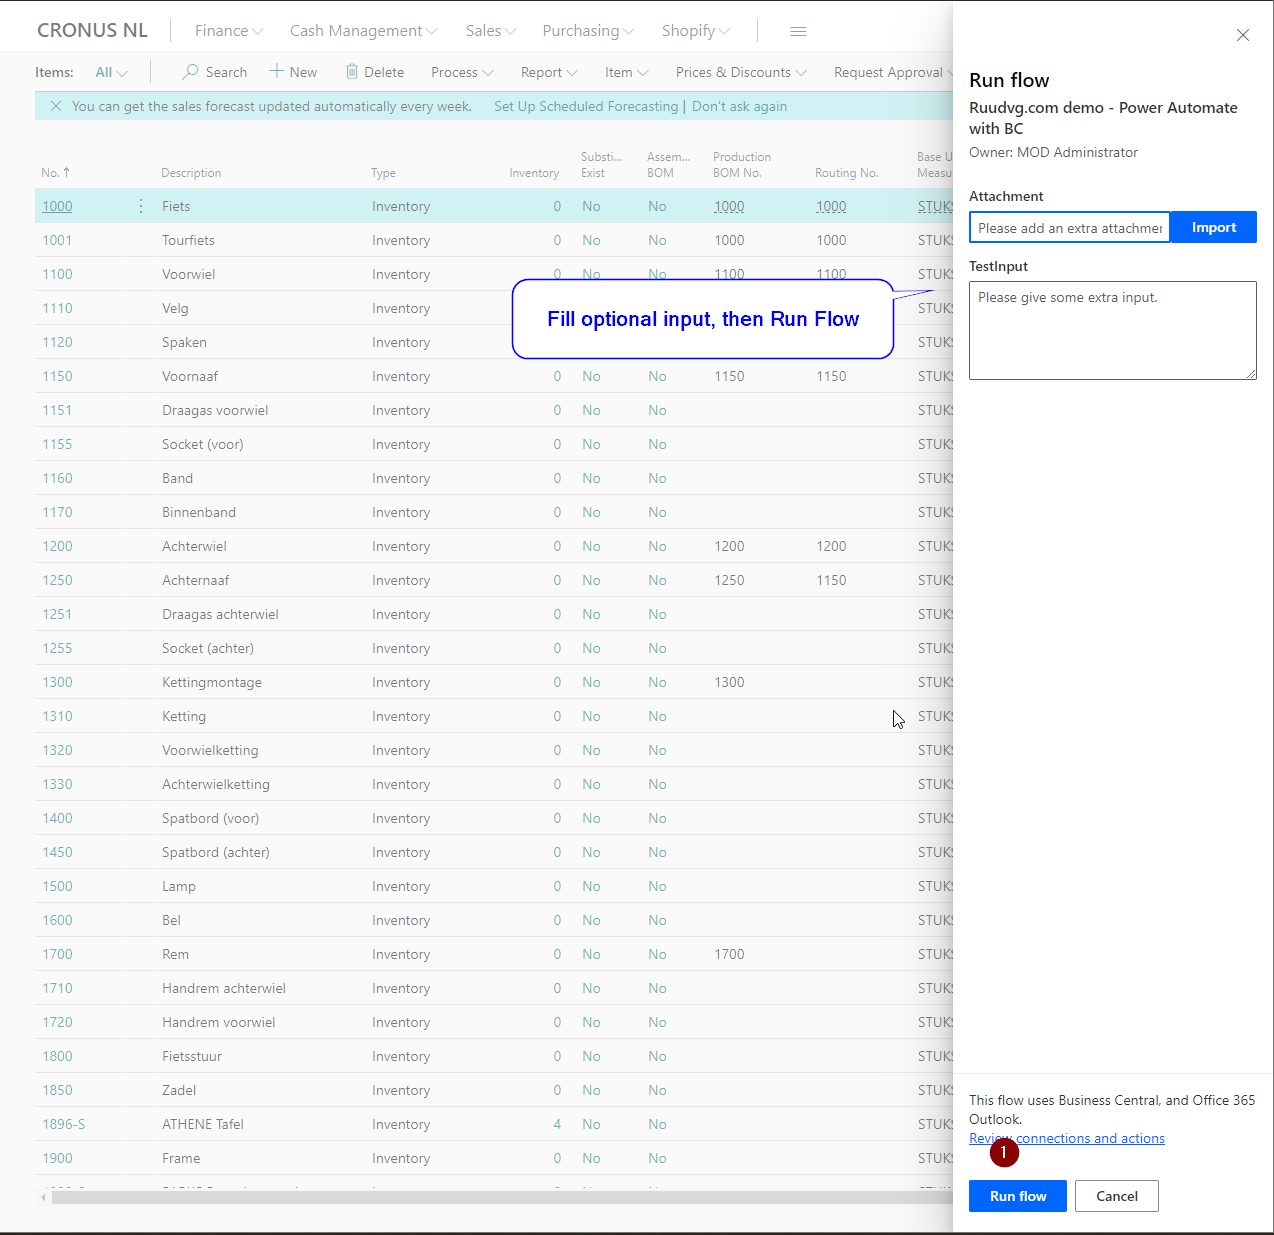
In Business Central the Power Automate flow will now be available on all the Pages that make use of the Item Table (Table 27). Press the Flow and a input screen will pop-up because we’ve defined input parameters.
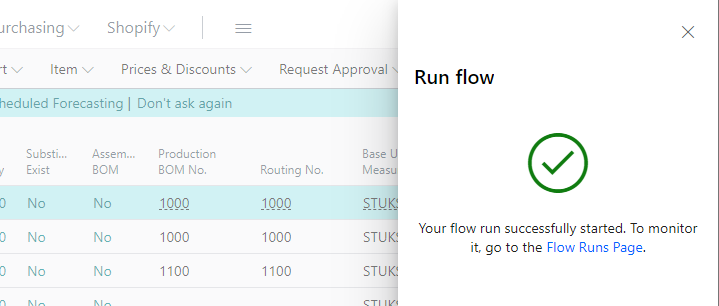
Fill the input parameters, then press “Run Flow”.
The Flow has run, now go back to Power Automate.
6. Check the result in Power Automate
In Power Automate, open your Flow by navigating to the “My Flows” list. Open the Flow, then ensure that the Flow has run correctly.
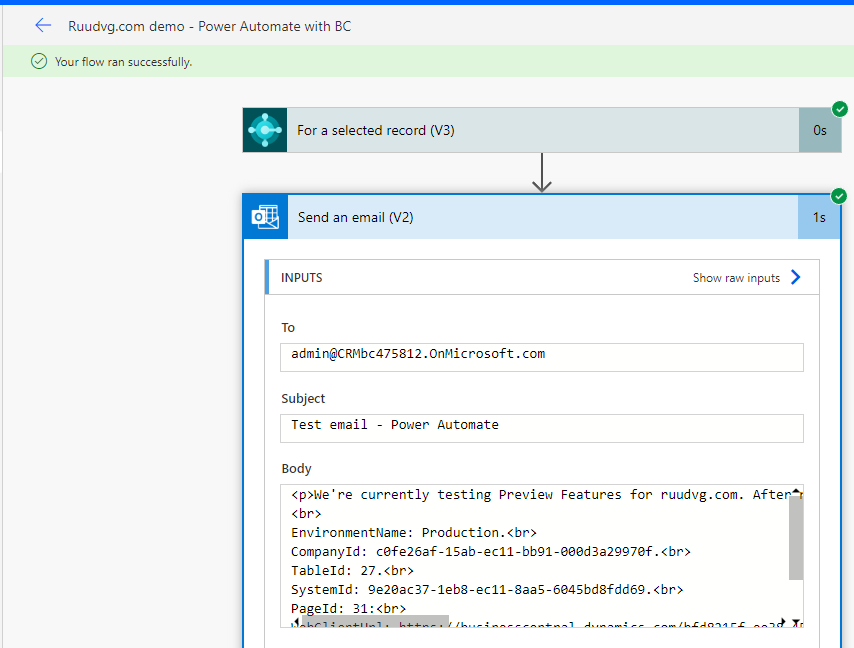
In my case, the result will be an e-mail with contextual information ánd a pdf-file!
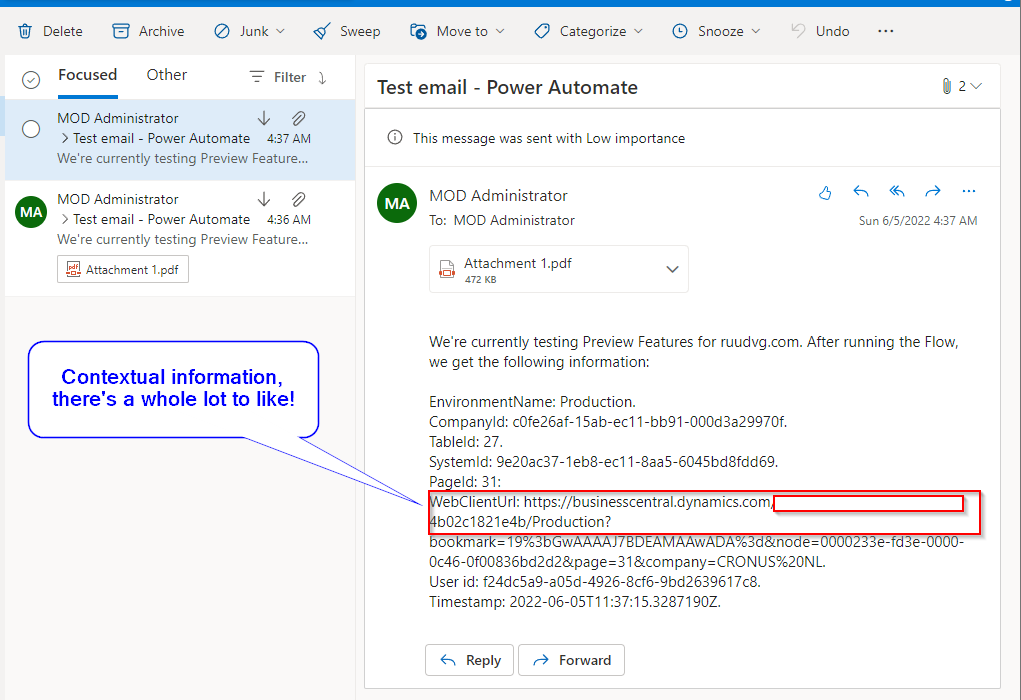
I think two things stand out in this new functionality:
- We have the ability to define a lot of input parameters and even add attachments. The base64-content of the attachment will be passed from Business Central to Power Automate, which is great.
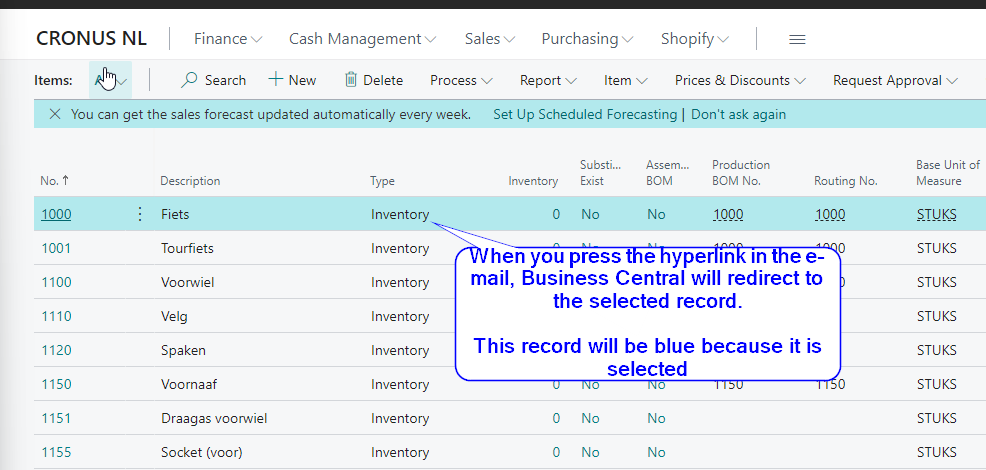
- The contextual information offers a lot of information; especially the WebClientUrl is extremely valuable because it redirects to the record that was selected in Business Central. So if your end-user clicks the hyperlink in the e-mail, the user will be redirected to the correct record directly!
7. Final thoughts
The new Power Automate features that Business Central offers is something I’ve been wanting for a long time. It’s finally possible to create Power Automates that are Business Central aware. Before this was not possible. You could run Flows from BC, but when the Flow was triggered we did not know on which record it was triggered. Another thing to point out is that you can run these new BC-Flows from ANY page or table. As long as you can access the page through the BC user interface, you can run a Flow from it. This opens up a whole lot of new integration scenario’s.
Perhaps I want to directly send a Teams-message to the logistical warehouse manager once I’ve released a big batch of sales orders? No problem, use a Power Automate Flow. Want to create different types of mail notifications directly from Business Central? No problem, use Power Automate! The possibilities are almost endless, so I hope I gave you some inspiration to try out and explore this new feature.
Thanks for reading!
Power Apps – ForEach loops in Canvas apps using the ForAll and Sequence function
Hey all,
Before 2020 it was possible to create ForEach loops in Power Apps by using a Timer. The Timer would be used to execute an action until a certain counter value is reached. An example can be found in, for example, this blog post: https://powerusers.microsoft.com/t5/News-Announcements/How-to-do-ForEach-or-Do-while-loops-in-power-apps-canvas/ba-p/346392. This approach works but feels a little bit inconvenient. Regular programming languages have a ForEach function which can be used to iterate for a defined amount of this. When googling on how to create ForEach loops in Power Apps, most search results state you’ll have to use a Timer to create a loop. The next time you Google, I hope you’ll find this blog and see there’s also a different approach.
However, since July 2020 is it possible to create ForEach loops in Power Apps using the ForAll function in combination with Sequence! 😃 The Microsoft documentation states that ForAll/Sequence can be used as follows: “Use Sequence with the ForAll function to iterate a specific number of times.”: https://docs.microsoft.com/en-us/powerapps/maker/canvas-apps/functions/function-sequence. Shane Young also has a great video about this: https://www.youtube.com/watch?v=oKJkVx2gehw.
Anyhow, a small example from the Microsoft documentation on how to create a ForEach loop is:
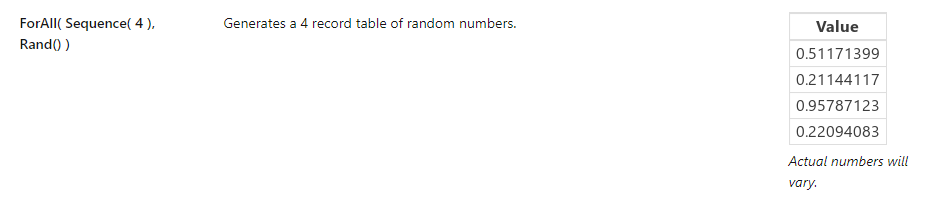
This code does the following:
- Iterate 4 times.
- Generate a random number.
- The result is a table with 4 random numbers.
If you combine the function above with a Collect function the random numbers will be added to a collection.
By replacing the Rand() function in the sample code below with your own code you can create your own For Each loops!


Business Central API – list of all endpoints for the API
When playing around with the Business Central API, I noticed that the documentation was quite brief on how to call an API endpoint. This ultimately resulted in quite some trial and error, eventually finding the correct endpoint. Are you struggling to find the correct endpoint URL for your environment? Say no more, this blog post has you covered!
BC13:
- SaaS single tenant: https://api.businesscentral.dynamics.com/v1.0/<yourTenantID>/api/beta/companies.
- We provide the beta parameter here, because the API was still in bèta when BC13 was released.
- SaaS multi tenant: https://api.businesscentral.dynamics.com/v1.0/<Azure Tenant ID>/<Company ID>/api/beta/companies.
- On-Prem:
- https://nav.contoso.com:7048/bc/api/beta.
BC14 and up:
- SaaS single tenant: https://api.businesscentral.dynamics.com/v2.0/<Business Central Tenant ID>/production/api/v1.0/companies.
- Change the Production parameter into Sandbox if you want to call the API on a sandbox environment.
- SaaS multi-tenant: https://api.businesscentral.dynamics.com/v2.0/<Azure Tenant ID>/<Company ID>/api/v1.0/companies.
- The Azure tenant ID can be obtained through the Azure Portal.
- On-Prem:
- https://nav.contoso.com:7048/bc/api/v1.0.
For more information on how to connect to an on-prem environment, you can check the following blog post: https://ruudvg.com/2020/03/22/connecting-power-apps-to-business-central-on-premises-data/. Enjoy and happy integrating! The original Microsoft documentation can be found here: https://docs.microsoft.com/en-us/dynamics-nav/endpoints-apis-for-dynamics.

Connecting Power Apps to Business Central on-premises data
So, you want to connect your Power App to Business Central on-premises data? Had a look at the Microsoft documentation, but don’t know how to proceed? Then this blog post is for you!
I had the same problem. I needed to connect to BC on-prem data for a Power App. However, the documentation was brief and not a complete guide. When connecting to NAV data in Power Apps, using your ODATAv4 base URL was sufficient. This does not work for BC, however. In order to connect to BC on-prem in Power Apps, the steps below need to be taken.
- Enable REST API’s in the Business Central Administration Center.
- Configure an SSL certificate and configure the firewall so Power Apps can communicate with your BC on-prem instance.
- Define the REST API endpoint.
- Create a service account in Business Central necessary for authentication.
- Test the API with Postman.
- I assume you have knowledge of how to use Postman or any other API testing tool.
- Connect to your on-prem data in Power Apps!
1. Enable REST API’s in the BC Admin Center
The Microsoft documentation on the BC on-prem connector states we need a web service URL to connect to our data. In NAV this was the ODATAv4 base url. This is not applicable for Business Central. In BC, your REST API endpoint acts as your web service url. This means that configuration needs to be done in the BC admin center. If you are a consultant, let your tech engineer configure this. I did ;-). Some changes also need to be made to the firewall, more about that in step 2.
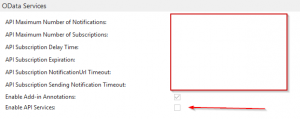
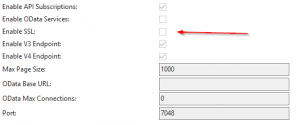
Anyhow, open the Business Central Admin Center. Select your service tier, navigate to the OData Services tab. On this tab, enable the API services. API services are now enabled on your service tier.
2. Configure SSL and configure the firewall
Next up is to configure SSL in the BC admin center. You’ll need a certificate for this. Also, outbound and inbound network traffic running over the port for the OData web services needs to be exposted through the firewall. This makes it possible to communicate with the Power Apps cloud service. Again, if this is not your expertise, let your colleagues do it :-).
3. Define the REST API endpoint
Once the configuration of the service tier is completed, we need the correct REST API endpoint that matches our BC version. The endpoint is built as follows, and is derived from the Microsoft documentation about API endpoints. This endpoint should be matched to your own environment.
- Business Central 13: https://nav.contoso.com:7048/bc/api/beta.
- Business Central 14 and up: https://nav.contoso.com:7048/bc/api/v1.0.
The structure of the endpoint is as follows:
- https://nav.contoso.com:7048 -> base url of your BC web client.
- /bc/ -> server instance name.
- api/beta or api/v1.0 -> default endpoint as defined by Microsoft.
4. Create service account for use with the REST API
Next step is to create a service account for use with the REST API in Business Central. The assumption here is that there’s no synchronization between your on-premises Active Directory and your Office 365 Azure Active Directory. If you are synchronizing your on-prem AD with the cloud, you should be able to use your windows log-in in step 5 and 6. To create a service account for use with the REST API, do the following in Business Central:
- Navigate to the users page.

- Create a new user and assign a license to the user.
- Generate a web service access key on the user card.
5. Test the API with Postman
You should be all set! We’ve configured the REST API on the service tier and created the necessary user accounts. Next up: test if the API works!
- Use Postman or any other API testing tool to test the REST API.
- Call the REST API endpoint that is applicable to your BC server. Use a GET request.
- Business Central 13: https://nav.contoso.com:7048/bc/api/beta.
- Business Central 14 and up: https://nav.contoso.com:7048/bc/api/v1.0.
- Choose basic authentication as the authentication method.
- Username and password: username created in step 4. Password is your web service access key.

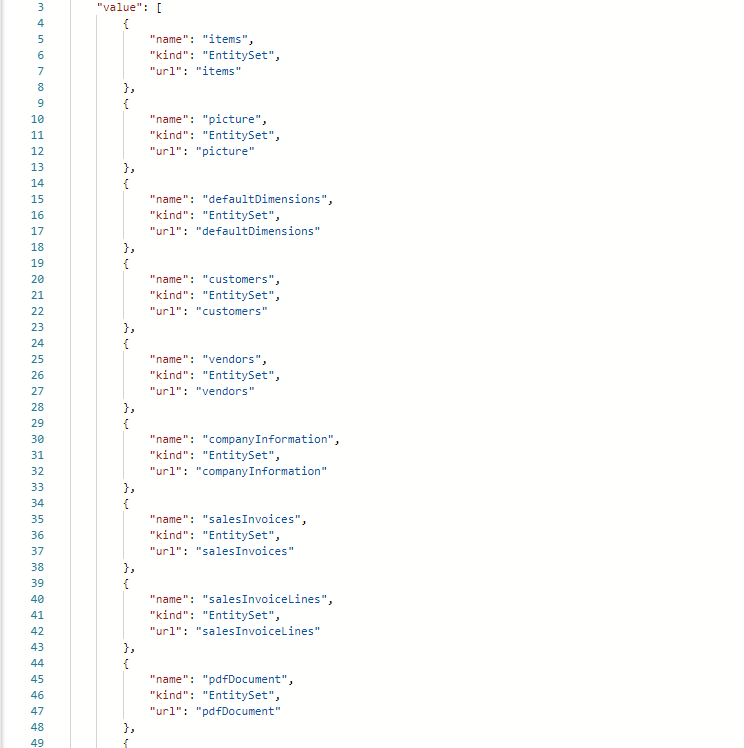
4. Calling the base URL should return all the entities exposed by the REST API. All of the endpoints that can be called, can be found in the Microsoft documentation: https://docs.microsoft.com/en-us/dynamics-nav/api-reference/v1.0/endpoints-apis-for-dynamics. You should get a 200 response, and the response should look like this:
6. Connect to your on-prem data in Power Apps!
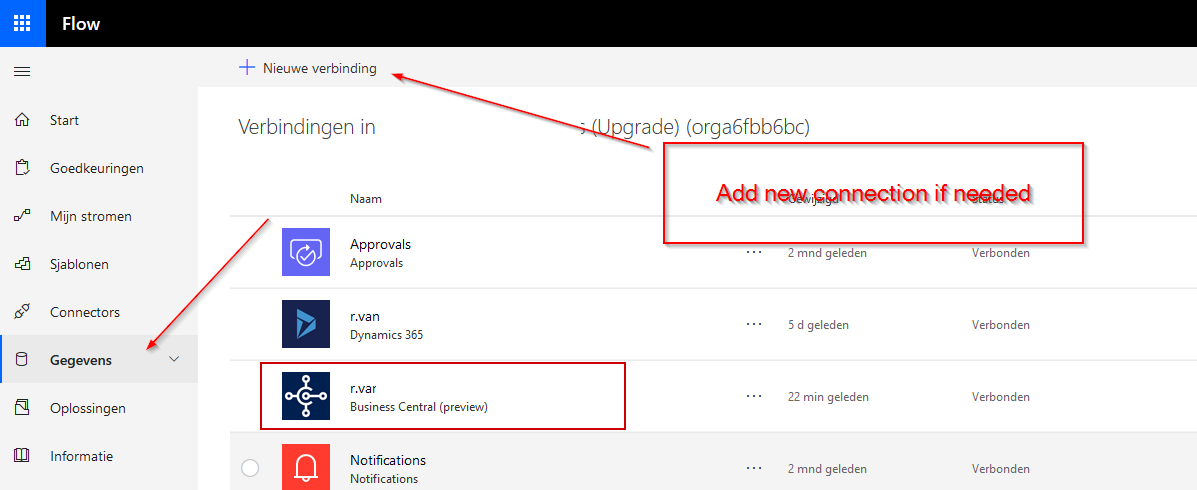
Our API is up and running, so now we can connect to our on-prem data in Power Apps! In Power Apps, navigate to your connections (it’s Dutch in my screenshot ;-)).
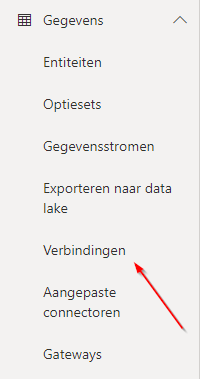
- Add a new connection, and select BC-on premises.
- Fill in the necessary information, defined in the earlier steps.
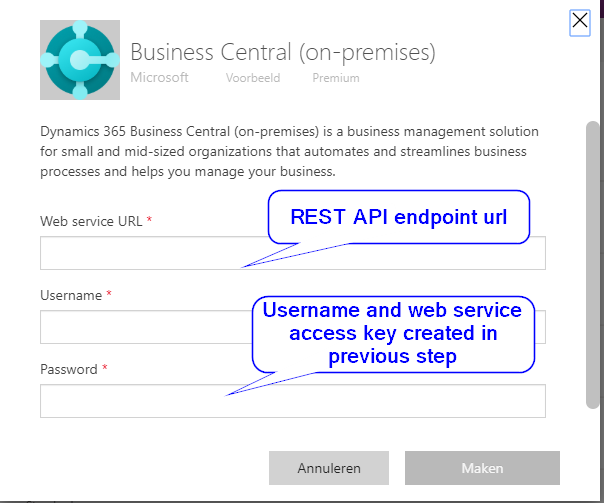
3. Boom! We now have an active connection that can be used in your Power App. Happy low-level coding!

Microsoft Business Central API (Beta) – Create a sales order and sales order line through PowerApps/Flow
At work I was experimenting with Microsoft PowerApps, Flow and the Business Central Beta API, trying to create a PowerApp that lets me create a sales order and the according sales order lines through Microsoft Flow. I ran into issues when I wanted to create a sales order line through Flow and got the following error message:
{
“status”: 400,
“message”: “ErrorCode: Application_DialogException You must specify a document id to get the lines.\r\nclientRequestId: bf31d2f6-3d8a-46d9-b0e6-0e8048352c7e”,
“source”: “api.businesscentral.dynamics.com”,
“errors”: []
}
So yeah, Microsoft Flow asks for a Document ID, but wait, there’s no field to specify the Document ID?

Luckily, Microsoft Flow supports HTTP requests which means that we can use the HTTP methods of the REST API’s to get our data. And that’s exactly what we are going to do. Follow through!
Side note: I assume you’re familiair with the basics of REST API’s, Microsoft Flow and PowerApps.
Prerequesites
The following is required to properly use the REST API of Microsoft Business Central:
- Access to a Dynamics 365 Business Central environment.
- Credentials necessary to connect and authenticate against the API. In this example I’m using basic authentication that works with a Web Service Access key. I’ll explain in this guide on how to get your key.
- Note: API keys are only suited for test environments. When going to production, you need to use AAD/OAuth v2. More information is found at this link: https://docs.microsoft.com/en-us/dynamics365/business-central/dev-itpro/developer/devenv-develop-connect-apps.
- Your tenant ID. Your tenant ID can be found in the URL of Business Central, like shown below. You can also find your tenant ID in Microsoft Azure AD.
![]()
- Access to Microsoft Flow.
- Optional: a PowerApp that uses the Flow. Showing how to create a PowerApp is out of scope for this guide, but I’ll use my PowerApp to execute my Flow. There are plenty of guides on PowerApps on Google and YouTube :-).
Acquiring a Web Service Access key
You need a Web Service Access key to connect and authenticate against the Business Central API. In Business Central, do the following:
- Use the search function in BC. Located in the upper right corner or use Alt + Q. Search for Users and click on it.
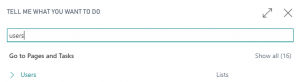
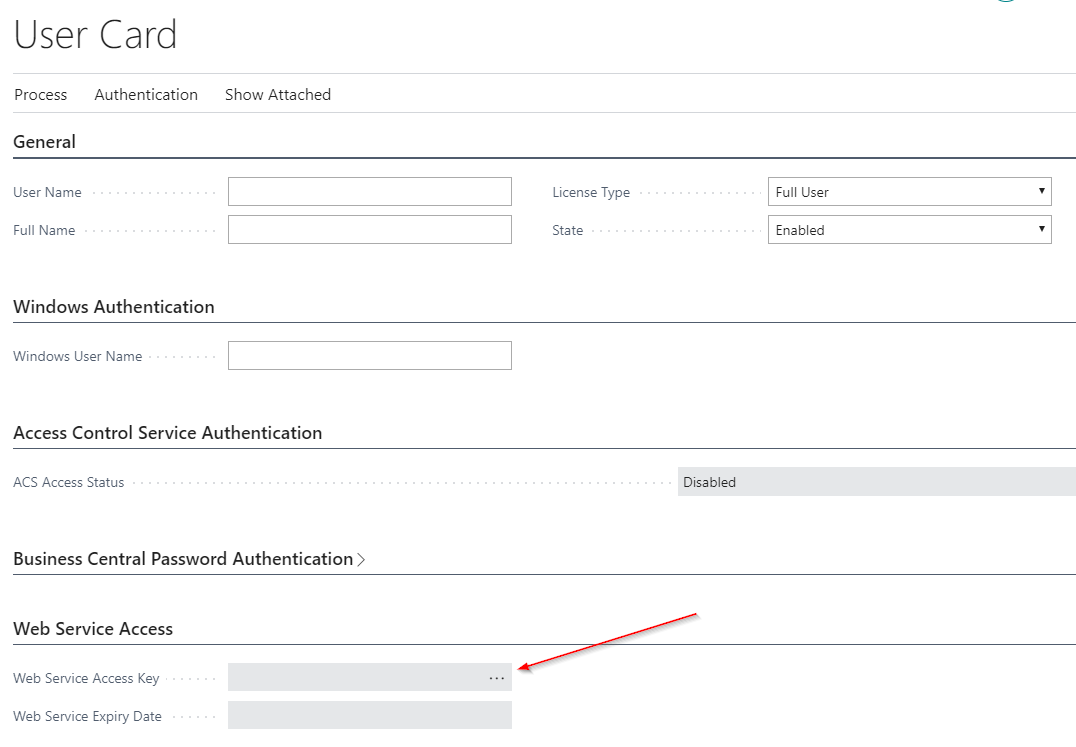
- Locate your user name and click on it.
- On the user card page, your user name that will be used for authentication is on the General tab. Write down your user name.
- Generate a new Web Service Access Key using the AssistEdit button or just copy the currently shown web key. If this field is blank, generate a new key. Write down the key, we need this in Microsoft Flow.

- We’re done in Business Central for now. Next step is to configure Microsoft Flow.
Configuring Microsoft Flow
Allright, we have our Web Service Access Key. Great! Next step is to build a flow in Microsoft Flow that executes a POST request to the Business Central API so that the sales order lines will get created. I’ll show my complete Flow and guide you through step-by-step. You probably won’t need all the steps; suit the Flow to your needs.
- Step 1: make sure you have a connection with Microsoft Business Central in Microsoft Flow. I assume you are reading this guide because you can’t create sales order lines. Anyway, check your connections tab and make sure you have a connection with BC. Screenshot below is in Dutch, I’m lazy and Dutch ;-).
- Create a new Flow in Microsoft Flow. Easy peasy, not going to explain this.
- Open your newly created Flow.
- Time to explain the Flow I created before. Follow along and at the end you’ll have a Flow that creates sales order lines.
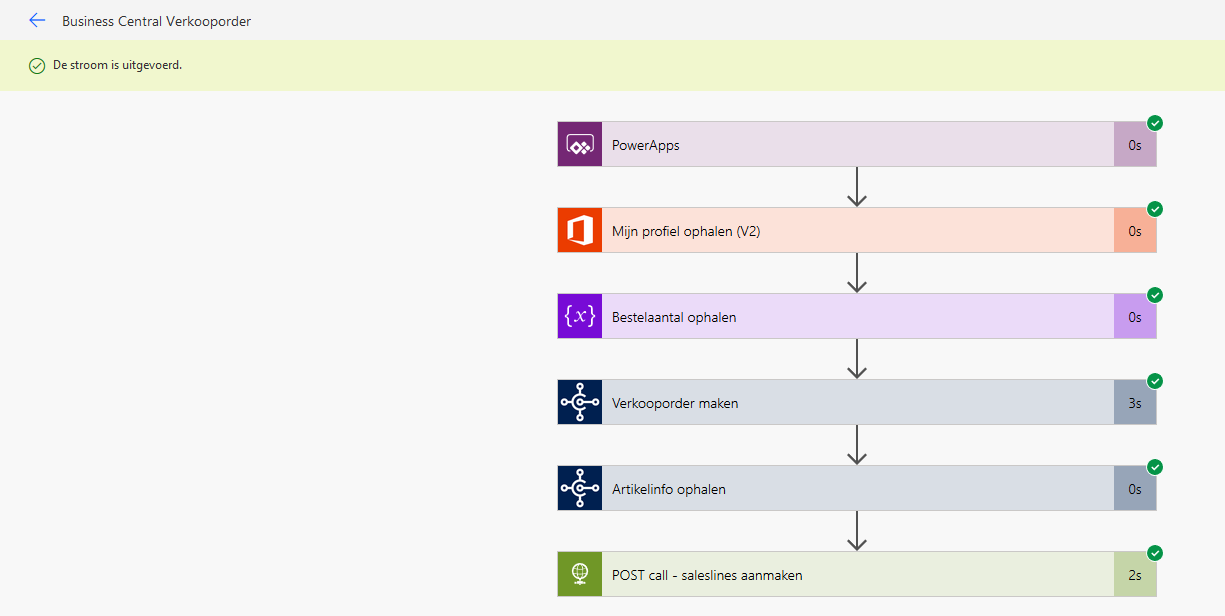
Creating the sales order lines Flow
The screenshot below shows the Flow that I used to create sales order lines. I’ll explain every step along the way; you don’t need all of them for it to work. The steps required are numbered from 1 to 4.
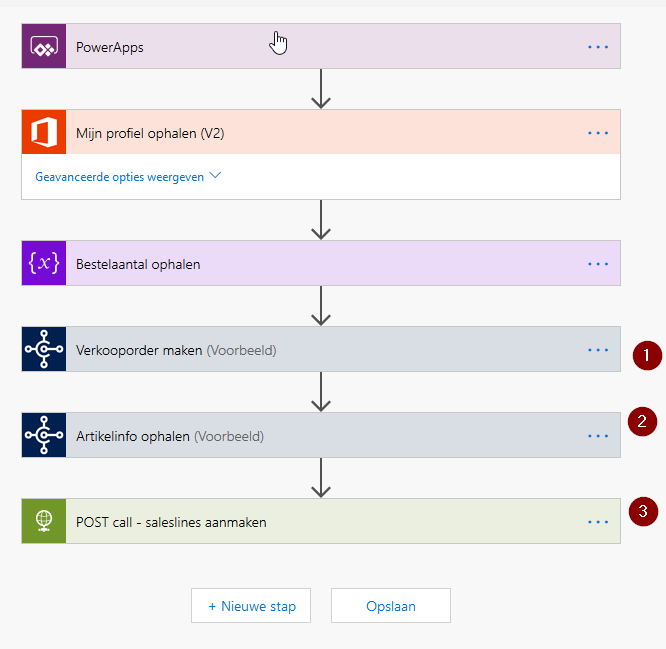
PowerApps:
- This trigger step is required to run a Flow from a PowerApp. If you want to run your Flow through a PowerApp, use this step. If you don’t, you don’t need it.
Get My Profile (V2):
- Gets your Office 365 profile information for use in Flow. Not required, but nice if you want to make your mails/messages more personal. I usually use this step in combination with the O365 Outlook connector.
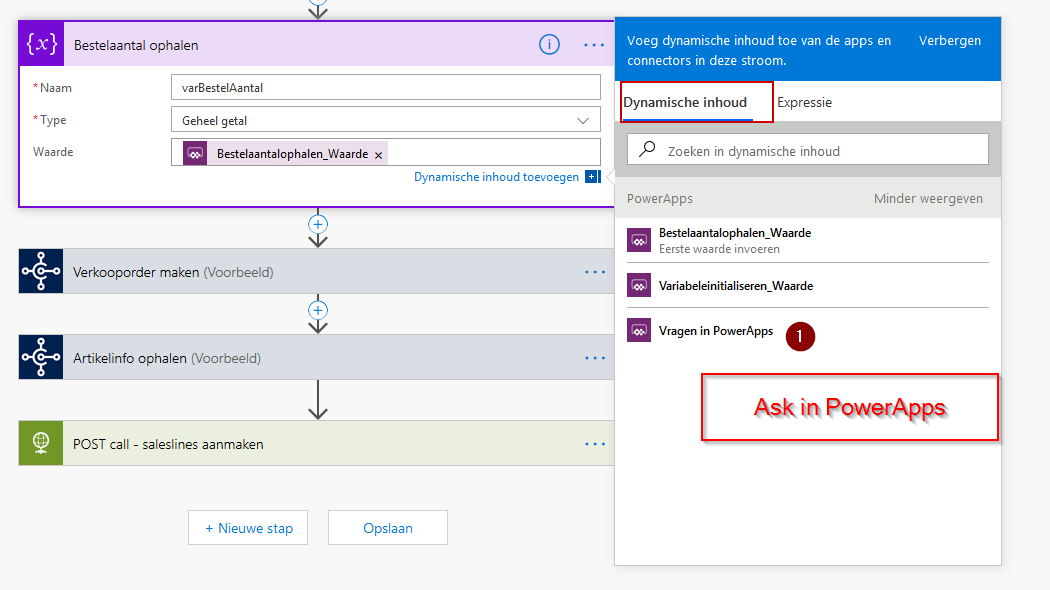
Variable step:
- This step is not mandatory, but I used a variable because I use this Flow in PowerApps. This step stores the item amount the user gave up in the PowerApp and saves it in the variable for later use. If you use this step, give it a logical name like any variable, set the Type to Integer and the Value to: Ask in PowerApps.
Create a empty Sales Order (MANDATORY):
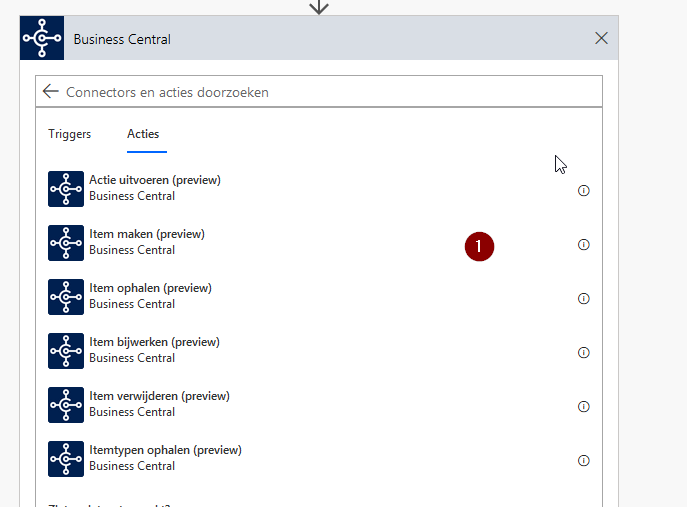
Here come the mandatory steps. Step 1 is to create a empty sales order action. Click New Step in Flow -> Search for Business Central -> Actions -> Create Item.
Next up, select the Company that the step applies to and select the Table. For this example I’m using the Cronus demo company and the salesOrders table. Then, fill the following fields:
- orderDate: use a function to automatically fill the date. Here’s the expression I used: formatDateTime(utcNow(),’yyyy-MM-dd’).
- customerNumber: I selected customer 10000 for this example. You can also ask this in PowerApps if you want. For now, just use a dummy.
Get the items that we need to add to the sales order (MANDATORY):
We just created the step to create an empty sales order in Flow. Next step is to get the item info of the items that need to be added to the sales order. Perform the following steps:
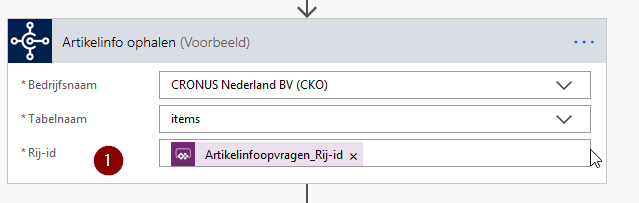
- Insert a new step in Flow -> Select Business Central connector -> Get item. Fill in the company name and the table name. Company name in this example is Cronus, table is items.
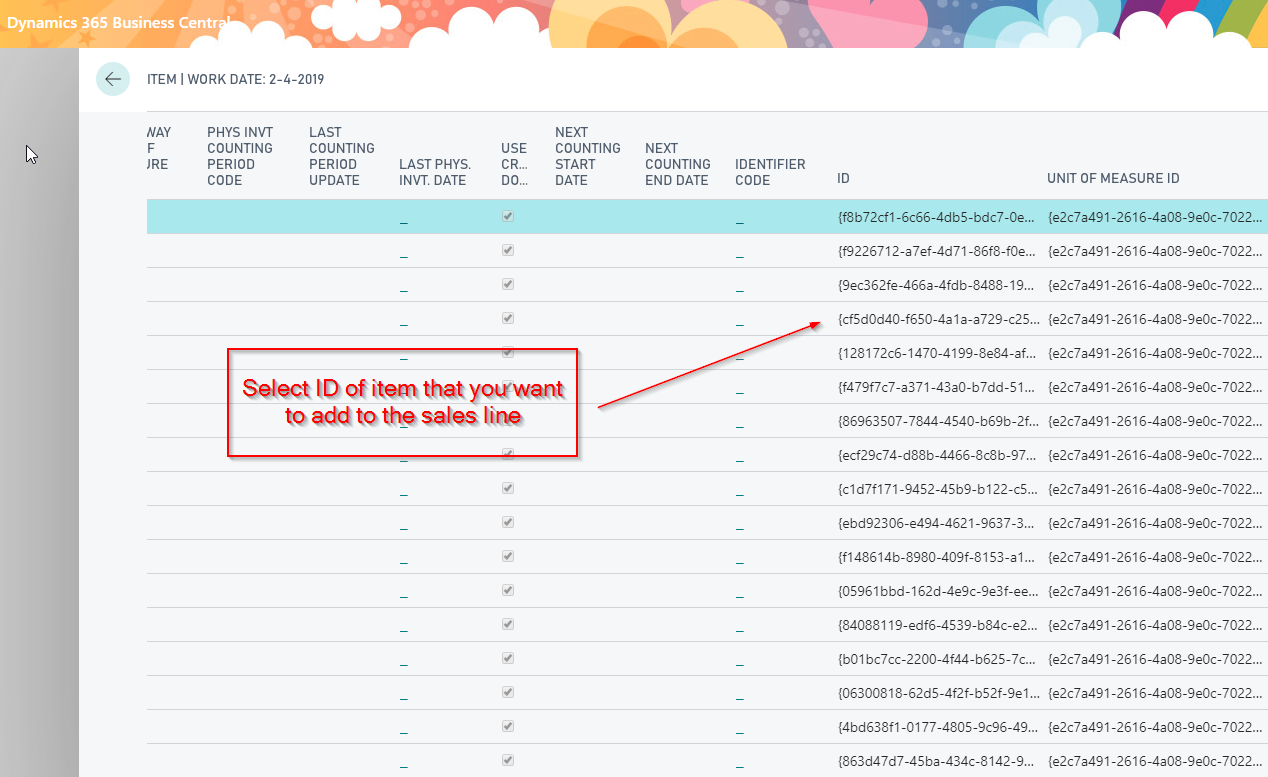
- Next up we need the Row ID of the item that needs to be added to the sales order line. I use PowerApps to dynamically determine the Row ID of an item. You can also use the Table Viewer in Business Central to determine ID of the item you want to add to your sales order: https://businesscentral.dynamics.com/?table=27. Scroll to the right to see a list of ID’s that you can fill in.
Fill in the selected Row ID in Microsoft Flow.
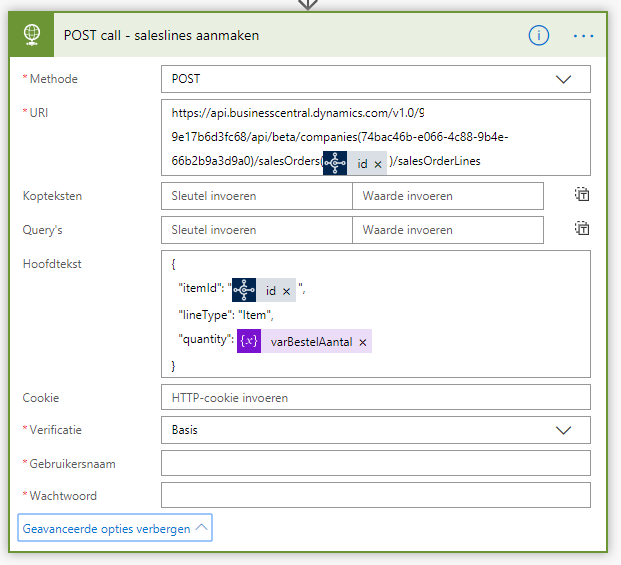
Final step – use a POST call to create a sales order line (MANDATORY):
- Add a new step in PowerApps -> Search for HTTP -> select the basic HTTP connector. Don’t choose the Swagger or Webhook connector.
- Fill in the following information:
- Method: POST.
- URI: https://api.businesscentral.dynamics.com/v1.0/<yourTenantID>/api/beta/companies(<company ID>)/salesOrders(<Sales order number>)/salesOrderLines
- Retrieving the company ID is explained at the following URL: https://docs.microsoft.com/en-us/dynamics365/business-central/dev-itpro/administration/dynamics-microsoft-automation-company-get.
- Use the following JSON body:
- {
“itemId”: “<item id retrieved in previous step>“,
“lineType”: “Item”,
“quantity”: <fill in number or use variable in Flow>
}
- {
- Click Show advanced options.
- Verification Type: Basic.
- Fill in the username and password you’ve retreived in the step “Acquiring a Web Acess Key”.
See the screenshot below of the configuration I used. I’ve hidden my Tenant ID.
Executing the Flow
We just created a Flow that creates an empty sales order, retrieves an item based on an item ID and creates sales order lines. Next step is to test the Flow and ensures it works.
- While your Flow is in Edit mode, right click on Test in the upper right corner.
- Select “I will execute the trigger activity”. You can also use the previous values if you like.
- Save and test.
If executed succesfully, all steps will have a green check. I’ll show you the most important inputs below.
Input of the HTTP POST we executed
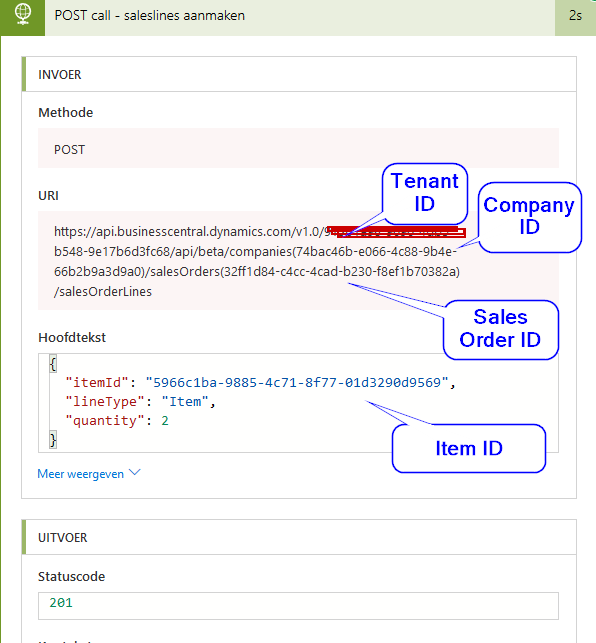
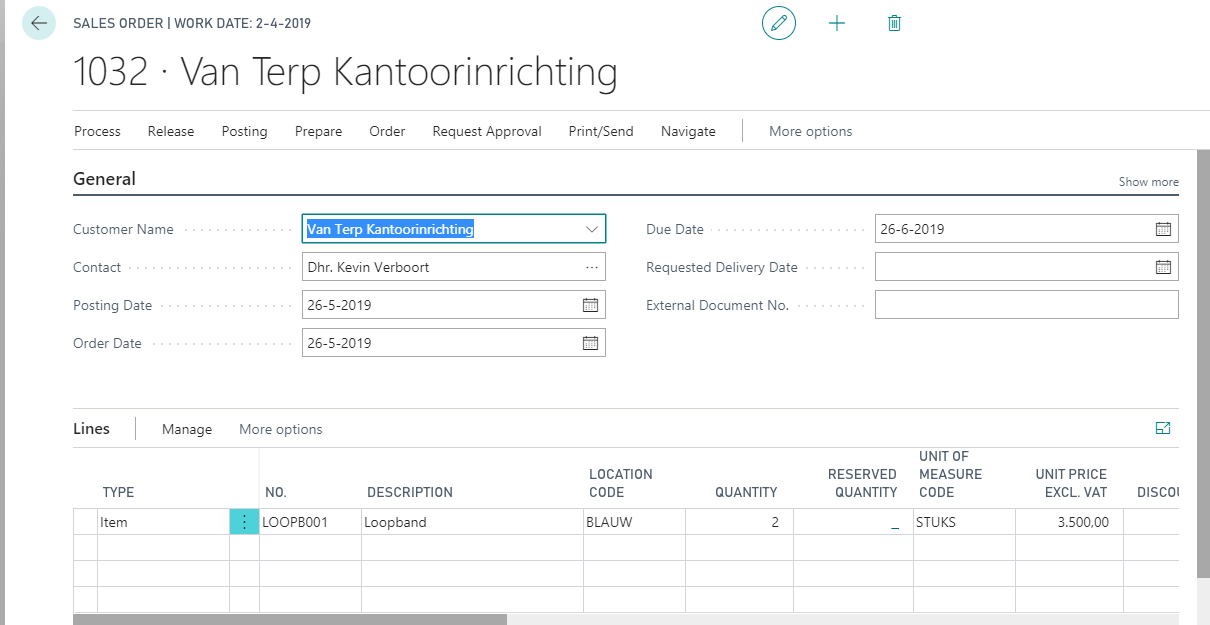
And the output in Business Central:
Hello world!
Welcome to WordPress. This is your first post. Edit or delete it, then start writing!